
An Apple ID is an important account if you want to use and have access to Apple services like iCloud, the App Store, the iTunes Store, Apple Music, and more. To create an apple id, it includes the email address and password that you use to sign in, and all the contact, payment, and security details that you’ll use across Apple services.
The important thing to remember is no matter where you create your Apple ID, remember to use the same one to sign in to every Apple service. That way, you can access and manage everything with a single account and password. In the article well learn how to create an apple id. You can create an apple id via following ways
1. From your iPhone, IPad or iPod
2. Computer
3. Another device
Also read,The Desired iOS 14 Beta Launched Finally- How to Download, Features and More
Create an Apple ID on your iPhone, iPad, or iPod touch
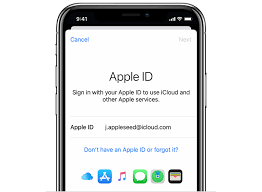
When you set up on your new iPhone, iPad, or iPod touch, you are required to enter your Apple ID and password. If you don’t have an Apple ID, you can create a new one when you set up your device. You can also set it up later in the App Store.
Create an Apple ID when you set up your device
1. Tap Forgot password or don’t have an Apple ID.
2. Tap Create a Free Apple ID.
3. Select your birthday and enter your name. Tap Next.
4. Tap Use your current email address, or tap Get a free iCloud email address.
Create an Apple ID using the App Store on your device
1. Open the App Store and tap your profile picture.
2. Tap Create New Apple ID. If you don’t see this option, make sure you’re signed out of iCloud.
3. Enter your email, password, and choose the country or region that matches the billing address for your payment method. The email address you provide will be your new Apple ID.*
4. Read the Terms and Conditions and Apple Privacy Policy, then tap Agree to Terms and Conditions. Tap Next.
5. Enter your name and birthday, then tap to subscribe to Apple Updates if you’d like. This keeps you up to date on the latest news, software, products, and services from Apple. Tap Next.
6. Enter your credit card and billing information, then tap Next. You can also choose None, and learn what to do if None isn’t showing or you can’t select it. You will not be charged until you make a purchase. You can change or remove your payment details later.
7. Confirm your phone number. This can help to verify your identity and recover your account if needed. Tap Next.
8. Check your email for a verification email from Apple and follow the steps to verify your email address. Learn what to do if you need to set up email on your iPhone, iPad, or iPod touch.
9. After you verify your email address, you can use your Apple ID to sign in to the iTunes Store, App Store, and other Apple services such as iCloud.
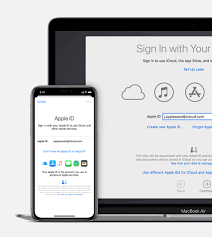
Create an Apple ID on your computer
On your Mac, you can create an Apple ID using the App Store. If you use a Windows PC, you can create an Apple ID using iTunes for Windows. If you don’t have iTunes for Windows, you can create an Apple ID on the web.
Create an Apple ID on your Mac
1. Open the App Store.
2. Click Sign in, then click Create Apple ID. If you don’t see this option, make sure you’re signed out of iCloud.
3. Read and agree to the Terms and Conditions.
4. Complete the form to create your new Apple ID. The email address you provide will be your new Apple ID.
5. After you’ve filled out the form, click Continue. If you see a message that says that the email address you entered is already associated with an Apple ID, follow these instructions to use an existing Apple ID instead.
6. Enter your credit card and billing information, then click Continue. You can also choose None, and learn what to do if None isn’t showing or you can’t select it. We’ll charge you only when you make a purchase. You can change or remove your payment details later.
7. Check your email for a verification email from Apple and follow the steps to verify your email address.
8. After you verify your email address, you can use your new Apple ID to sign in to the App Store and other Apple services such as iCloud.
Create an Apple ID on your Windows PC
1. Open iTunes for Windows. Make sure that you have the latest version.
2. From the menu bar at the top of your computer screen or at the top of the iTunes window, choose Account > Sign In. Then click Create New Apple ID.
3. Read and agree to the Terms and Conditions and Apple Privacy Policy.
4. Complete the form to create your new Apple ID. The email address you provide will be your new Apple ID. The form also includes security questions for your protection.
5. After you’ve filled out the form, click Continue. If you see a message that says that the email address you entered is already associated with an Apple ID, follow these instructions to use an existing Apple ID instead.
6. Enter your credit card and billing information, then click Continue. You can also choose None, and learn what to do if None isn’t showing or you can’t select it. We’ll charge you only when you make a purchase. You can change or remove your payment details later.
7. Check your email for a verification email from Apple and follow the steps to verify your email address.

Create an Apple ID on another device
To create an Apple ID on an Apple TV, Android device, smart TV, or streaming device,
1. the steps provided onscreen and enter your full name, date of birth, an email address or phone number, and a payment method.
2. create an Apple ID when you subscribe to services like Apple Music and Apple TV+, or when you download the Apple TV app.
3. set up the Apple TV app on your smart TV and need to create an Apple ID, you might be redirected to activate.apple.com.
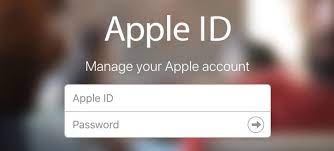
Create an Apple ID on the web
1. If you have trouble, try using the steps below to create your Apple ID on the web.
2. Go to the Apple ID account page and click Create your Apple ID.
3. Enter your name, birthday, email, password, and choose the country or region that matches the billing address for your payment method. The email address you provide will be your new Apple ID.*
4. Enter a phone number that you can always access.
5. Check the boxes to subscribe to Apple Updates if you’d like. This keeps you up to date on the latest news, software, products, and services from Apple.
6. Click Continue.
7. Follow the onscreen steps to verify your email address and phone number.
8. After you verify your email address, you can use your new Apple ID to sign in to the iTunes Store and other Apple services such as iCloud.
9. If you created a new Apple ID on the web and see a message that you need to sign in to iTunes, follow the steps below for your device:
10. On an iPhone, iPad, or iPod touch: Open Settings, then tap “Sign into device” and sign in with your Apple ID.
11. On a Mac: Choose Apple menu > System Preferences, then select Apple ID and sign in with your Apple ID.
12. On an Apple TV: Sign in to the App Store, iTunes Store, or Apple Music with your Apple ID.
13. On a PC: Sign in to iTunes with your Apple ID.
14. On an Android device: Sign in to Apple Music on Android with your Apple ID.
For a more better understanding, you can refer to the YouTube tutorial by clicking here